
Depth of field – the basics
“How do I get the background to go all blurry?” I remember that being the first question I asked my photography teacher at art college, years ago. It was either that or “Where’s the vending machine? I need a coffee!”
This is also a question I am asked a lot by friends, family and readers of this website (the blurry background one, not the coffee one) so I thought I would have a go at explaining it.

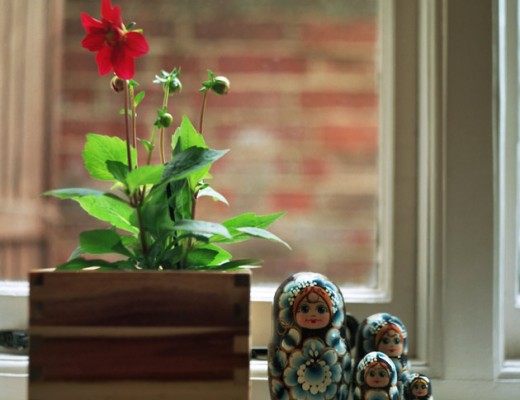
Canon 5D MKII + 70-300mm f/4-5.6 lens | 1/400th sec at f/5.6
What we are talking about here is ‘depth of field’ – shallow depth of field to be precise, and this is controlled mainly by the aperture (f/stop) of your cameras lens.

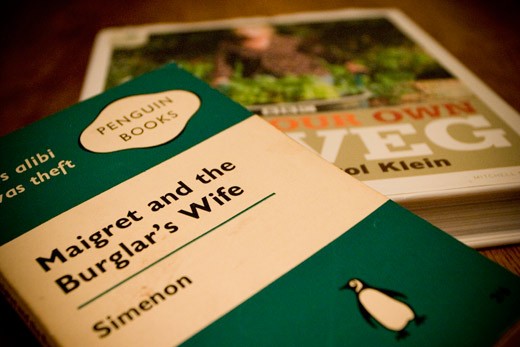
Canon 40D + 85mm f/1.8 lens | 1/400th sec at f/1.8
Taking photos with a blurred background – dSLR (or film SLR) camera:
- Set your camera mode to Aperture Priority (normally marked as A or Av).
- Set the aperture to the smallest possible number (your camera will now work out all the other settings).
- Stay reasonably close to your subject (the longer the lens the further away you can be).
- Make sure subject is not too close to the background.
- Take your photo.
Taking photos with a blurred background – compact / point and shoot camera:
- Set your camera to ‘portrait’ mode (even if you’re not taking a picture of a person).
- If your camera will let you, switch off the flash.
- Zoom all the way in (not digital zoom, that’s bad).
- Now you can position yourself and compose your shot, ensuring subject is not too close to the background.
- Take your photo.
There, that’s really all you need to know – although if you are using an SLR camera, getting to grips with a bit more detail will make the whole process even easier to master.
A bit more detail…
The wider you open the aperture the faster your shutter has to open and close, but there’s a limit to how fast it can shoot. I’ve made you a diagram! This should help explain things:

If you are in dazzling midday sun and you try and use a wide open (small numbered) aperture then your poor little camera-sensor (or film emulsion) won’t be able to cope and your photo will be over exposed.
You have a couple of options to overcome this – the first is to experiment with not quite so open apertures – depending on the situation you can sill get lovely blurry backgrounds at f/5.6 and even higher.
The second option is to use a filter – an ND (neutral density) filter looks like grey tinted glass, it sits on your lens and allows you to have your aperture open wider than the natural light would normally allow – there a really great article here that explains them in more depth).
Try to get quite close to the subject you want in focus and also ensure that your subject is as far away as they can be from the background. For instance, if you are photographing somebody leaning against a brick wall, the bricks are likely stay in sharp focus too – you need your subject to step forwards from the wall, I would suggest at least 10ft, that way the bricks should fuzz away into blurriness and your subject will look nice and sharp.
Obviously you want to make sure you have the correct thing in focus when you take your photo – when you are using VERY shallow depth of field you may need to be millimeter perfect. You may find it useful to adjust your camera setting so it focuses only on one spot (centre-weighted focussing) normally it would work out the focus by looking at many points. I will often switch to manual focus in these situations. If you don’t trust your eyes you might want to refocus and re-shoot a few times to make sure you’ve nailed your shot.

Canon 40D + 55-250mm f/4-5.6 lens | 1/1600th sec at f/5.6
Worth remembering…
Shooting with the aperture wide open, letting in lots of light is:
- great for portraits and any situation where you want to isolate your subject from a confusing background.
- perfect for shooting in low light without a flash.
- great for hand-held photographs (as opposed to using a tripod) as the faster shutter speeds mean you are less likely to get camera shake.
- a good option for sports photography because of the faster shutter speeds, it’s great at freezing the action but focussing can sometimes be tricky.
- not so good for traditional landscape photography where you tend to want to see lots of detail in the background too.
- can make using the auto-focus a little tricky – I switch to centre-weighted focussing and/or manual focus.
- is great for taking photos of animals at the zoo – the bars on the cage will fuzz away nicely and you will be left seemingly eye-to-eye with the beast in question.
Oh, and one last thing, the smallest f/stop number you will be able to use is shown as part of the lenses name – for example a 17-40mm f/4 lens will only ever be able to be dialled down to f/4.

Canon 5DMKII + 50mm f/1.4 lens | 1/3200th sec at f/2.8
There’s a LOT more we could talk about here, it really is one of the fundamentals of photography – I think this is as much as a basic introduction needs to cover though, we’ll save the rest for later!

10 Comments
Cass
12 October 2011 at 09:06Oh how I wish you had been around when I was starting out a few years ago… I remember seeing so much wonderful “bokeh” (a word that now annoys me for no good reason) and asking over and over again “how do you do that?” and no one would tell me. Then one day, some kind soul asked me what lens I was using: the kit lens. Max aperture of 5.6. Aha! “Invest in a cheap 50mm 1.8 lens and your problems will be solved”, said he. And he was right. At the time, I had no clue why this made a difference, but I was so grateful to be let in on the 1.8 secret
Angie
13 October 2011 at 12:32I know just what you mean about the word ‘bokeh’! I mean, I love what it actually is but the people that bang on and on about it can be very annoying
I am pleased that a kindly soul let you in on the secret of the ‘nifty 50’ and that it has led you to the brilliant photos I’ve been looking at on your website!
x
eva
13 October 2011 at 12:24this is so useful, just what i was looking for – thank you!
Angie
13 October 2011 at 12:33So happy to help x
x
paul
15 January 2013 at 16:21Hi Angie
great tutorial, and loved the freebee of 2013 PSD calendar
regards
Paul
Angie
20 January 2013 at 22:59Hi Paul – so pleased you liked it!
jenny
24 March 2013 at 17:10Hi Angie, Great article!!!
I have a Nikon Coolpix L26 Digital Camera and I am taking a picture of a canvas painting on a wall and shelf…
…I want the back ground to be blurred and showing no shadows (using vase as a prop),
Do you have any added advice as to how I can get the full potential from my shots? I don’t want to use too much computer software to edit.
Many thanks x
Wrecker in Orangeville
20 June 2013 at 18:04Asking questions are genuinely nice thing if you are not understanding anything totally, except this paragraph gives pleasant understanding yet.
saby
6 September 2013 at 12:16beautiful and easy way of teach you used. More than 50% confusion about photography is now blurred away. Thanks alot for your sweet words.
xx
repair center software
24 October 2013 at 12:20I am really loving the theme/design of your
web site. Do you ever run into any internet browser compatibility
problems? A couple of my blog readers have complained about my website not working correctly in Explorer but looks great in Chrome.
Do you have any advice to help fix this issue?