
The look when you see it is unmistakeable and really rather unique – by using a tilt & shift lens on an SLR camera you can adjust the lens so it is no longer parallel to the film/sensor and totally changes the way it deals with focus and parallels in the image you’re shooting (there are WAY better technical explanations out there by much cleverer people – I just like pretty pictures)!

1. New York Model?, 2. 16:46, 3. “This is London calling Bokehistan. Will you accept the charges?”
Whilst I believe the main reason for inventing this lens was to help compensate for converging lines when photographing such things as skyscrapers or cathedrals, one of the side-effects of this was an ability to ‘minaturise’ scenes when shooting from above (at least I assume it wasn’t deliberate – would anyone really design that on purpose)? When you first see this effect it’s quite a novelty and lots of fun, but that fun can die pretty fast when it’s over-used .
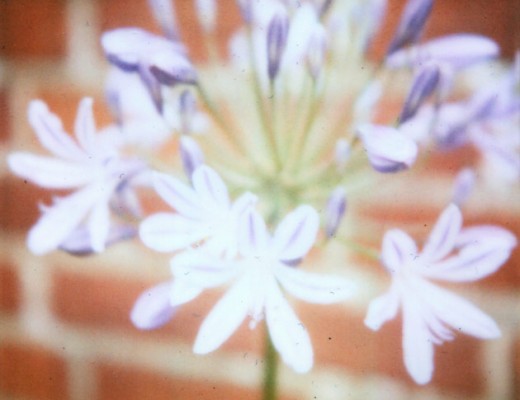
These aren’t the only two reasons for using a tilt and shift lens though – you can create some wonderfully dreamy and stylish effects by using it to throw the focus away from certain areas of your image and concentrate interest onto another. It’s great for portraits and I love how this effect looks when applied to rippling water or points of light.

1. _IGP2726, 2. untitled…, 3. Lauren & Poss44
So, pretty cool huh? There’s one problem though – these lenses are NOT CHEAP. Far from it. There are some ways around this though:
- Hire a lens – especially if you’re a Canon or Nikon user, you should have no problem renting one of these to try for a weekend (I intend to do this soon – I can’t wait)!
- Make one. No, really! I’ve seen some very do-able tutorials for creating you very own tilt and shift lens.
- Try a Lensbaby – the principal of these lenses is very similar to a full-on tilt and shift lens – I have an early model and you do indeed get some lovely effects and they are a lot less expensive than a full-on tilt and shift lens.
- Check out your point-and-shoot camera, you may well have an ‘artistic’ mode on there that attempts to emulate a tilt and shift lens – on my Canon G12 it’s called ‘miniaturize’. Obviously this won’t be anything like as good as the real thing but it’s a reasonable substitute.
- Equally there are apps out there for your phone which will also create a tilt-and-shift style effect – i.e. Instagram allows you to place a round or linear area of focus (which you can re-size or twist).
- You can apply a filter in post-production – below are some instructions on how to do it with Photoshop but the principle should be easy to adapt to most photo editing packages. Speaking of which…
How to get a tilt and shift effect using Photoshop

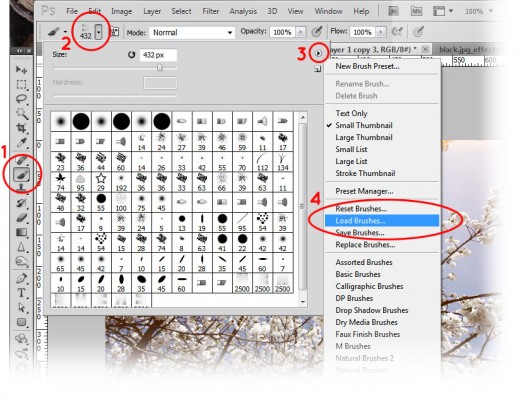
- Open your image, re-size it to the size you want to output and covert it to a Smart Object (right-click on the layer in the Layers Palette and select ‘Convert to Smart Object’.
- From the top menu choose ‘Filter > Blur > Gaussian Blur’ and adjust the slider until it’s as blurry as you want the blurriest bits to be.
- You will see on the ‘Smart Filters’ layer there is already a layer mask (the white box) – click on that so it’s highlighted.
- For a circular point of focus: first choose a big soft brush and paint a black blob over the area of the image you want in focus, then change the opacity of your brush to 50% and paint a slightly larger blob over the same area (so you don’t get a hard line).
- For a linear point of focus, choose the gradient tool from the left hand menu, along the top menu you’ll see 5 style of gradient, you want number four (it goes dark to light to dark again) – on the image drag from the centre point of where the focus should be out to where it should be blurred.
- At any time you can double click on the ‘Gaussian Blur’ layer in your Layers palette and adjust the strength of the blur or you can start again with your mask by filling it all with white.


Hopefully this all makes sense! I’m not so much trying to create the miniature effect here – more the artistic shifting of focus.
Have you ever been lucky enough to play with a tilt and shift lens (of any description)? Were you pleased with the results? Let me know too if you’ve seen any great examples of tilt & shift in action!

7 Comments
eva
16 May 2012 at 11:47i’ve seen this effect to use on my phone when i take a picture – now i know what its all about
Angie
19 May 2012 at 21:02Cool, huh?
Life with Kaishon
16 May 2012 at 13:16You are the best teacher : ) Thank you for always sharing. I really appreciate you!
Angie
19 May 2012 at 21:02Thanks, lovely x
alexa
16 May 2012 at 21:39This is such a useful tutorial! I will bookmark for exploring later … Such gorgeous photos!
Angie
19 May 2012 at 21:03Thanks Alexa 😀
Volden
3 September 2014 at 08:34I`m using Alien Eye “Bokeh”. Really great tilt-shift effect maker